The following describes how to create a scheduled job stream for automatic updates of opening balances for cash and bank accounts using Job Control. Here, we will schedule a batch job that will be submitted every morning, Sunday through Thursday, at 4 AM. By doing so, you are sure to have all opening balances properly updated each working day.
- Select the Work with batch programs menu item.
- You access Batch programs table maintenance. Click Add.
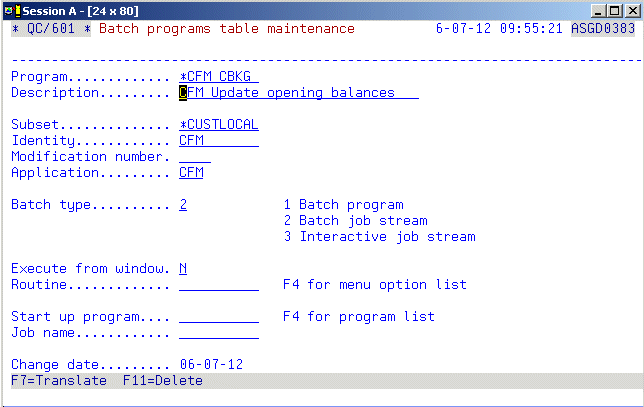
- You access the detail panel:
- Program
- Enter the batch job stream name to identify the job stream.
- Tip: It is recommended that the job stream names start with an asterisk to distinguish them from the batch program names. It is also suggested that the defined company dependent job stream names end with the company code suffix that denotes for which IBS Enterprise company the job is going to be submitted. In the following tasks, company code KG will be used.
- In this case, enter *CFM_CBKG.
- Description
- Enter a description of the batch job stream.
- Subset
- Enter the subset level for the job stream. The subset level should be the domain decided by the system administrator. In this case, enter *CUSTLOCAL.
- Identity
- Enter an identity for the job stream. In this case, enter CFM. This field is mandatory but it is not currently used anywhere.
- Application
- Enter the application to which the job stream belongs, i.e., CFM which must be activated.
- Batch type
- Enter batch type 2 (batch job stream).
- Execute from window
- Set to NO.
- Select the Work with job control table menu item.
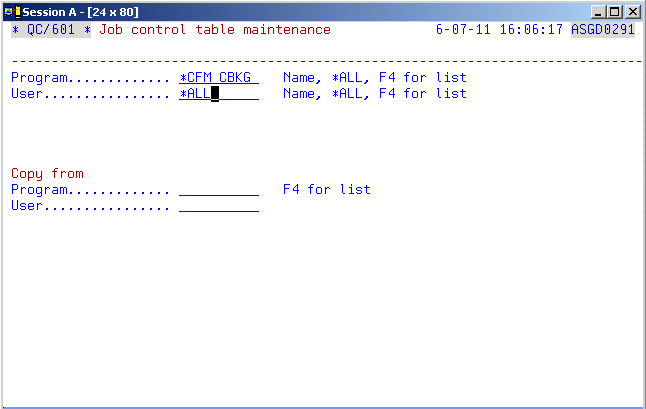
- You access the Job control table maintenance:
- Program
- Enter the batch job stream name, i.e., *CFM_CBKG.
- User
- Enter *ALL.
- You access the Job control table maintenance detail panel. Click Add.
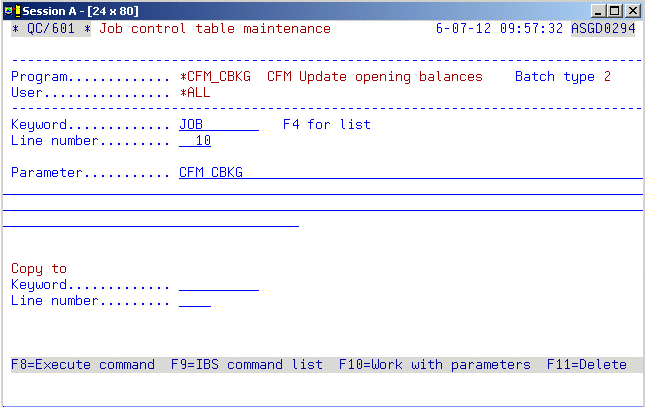
- You access the second level detail panel:
- Sq
- The sequence value is automatically assigned by the program based on the entered keyword, but can be resequenced on the Job control table maintenance detail panel by clicking Resequence line number. It may also be left blank if no resequencing is needed.
- Keyword
- The keyword JOB (Sq 2, Line 10) – is the parameter that defines the job name that will be submitted by the job stream manager. It is recommended that the job name is the same as the job stream with the initial asterisk dropped.
- The keyword JOBQ (Sq 2, Line 30) – is the parameter that defines the job queue name to which the job will be submitted by the job control manager. The job queue name must exist in the system.
- The keyword EXCBPGM (Sq 4, Line 30) – is the parameter that defines a command that sets the environment for the selected company. The proper company code must be entered between the parentheses for each customer installation. In this task, company code KG is entered.
- The keyword EXCAPGM (Sq 5, Line 40) – is the parameter that defines the command that calls the actual update program.
- Caution: This parameter line must be entered exactly as shown in the table above.
- Line number
- Enter the applicable line number to sequence lines with the same keyword.
- Parameter
- Enter the parameters for each keyword shown in the table above.
- Tip: Parameters with a variable may be prompted, e.g., COMPANY.
- You access the Job control table maintenance panel:
- You access the OS/400 command panel:
- Job name
- This field is defaulted with the job you are working with.
- Command to run
- This field is defaulted with the proper command string parameters and must not be changed.
- Frequency
- This value must be entered to determine how often the scheduled job should be submitted for execution. Here, enter *WEEKLY.
- Schedule date
- Here, enter *NONE.
- Schedule day
- This value must be entered to determine how often the scheduled job should be submitted for execution. Here, enter *SUN, *MON, *TUE, *WED, *THU.
- Note: This job should be scheduled to run once a day every Sunday through Thursday. This requires five repetitions of the entry in this field and all other entries in this step.
- Schedule time
- This field allows you to determine at what time during the day this job should be executed. Here, enter 04:00:00.
Panel image
Complete the following fields:
Click OK. The defined job stream action sequence must now be entered into the Job control table.
Panel image
Complete the following fields:
Click OK.
Panel image
On this panel you have to enter the action sequence items for the update job stream. The following is the compiled list of commands to execute:
| Sq | Keyword | Line | Parameter |
|---|---|---|---|
| 2 | JOB | 10 | CFM_CBKG |
| 2 | JOBQ | 20 | ASWSINGLE |
| 4 | EXCBPGM | 30 | CHGASWCOM COMPANY(KG) |
| 5 | EXCAPGM | 40 | EXCASWPGM PGM(FCMR021) PARM(N) |
Each of the lines must be entered one by one. Complete the fields one by one according to the list above. See the following comments which are connected to the fields:
When you have entered all the above item sequences, return to the previous panel.
Panel image
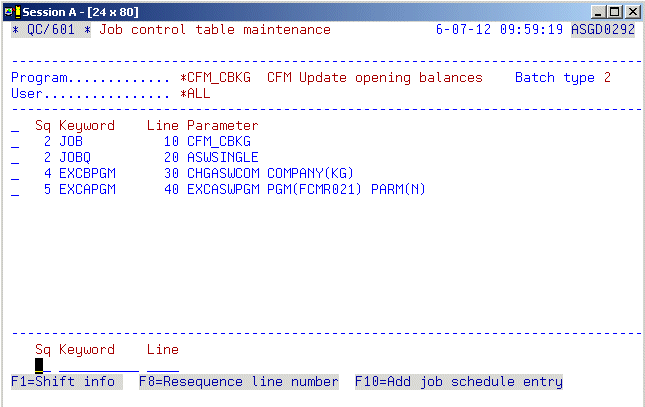
All the entered item sequences are displayed on this panel. You have to add the job to the OS/400 scheduler. Click Add job schedule entry.
Panel image
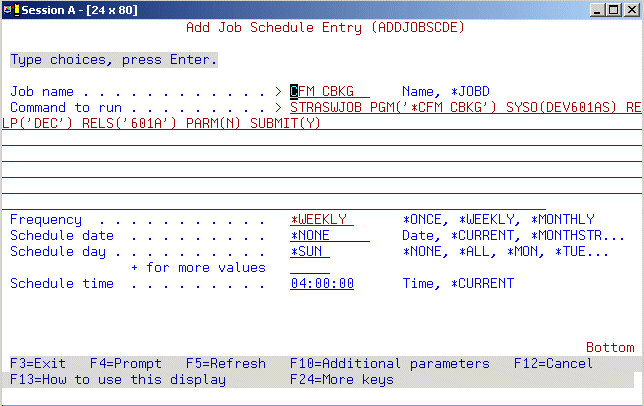
The following fields are relevant:
Click OK. Exit the routine.